 |
| Bluemix Secure Gateway |
For my test I logged into my Bluemix account and created a Python web application. Then I added the Secure Gateway service to that application. That service can be found in the "Integration" category, the correct category as this service allows integration of private infrastructure with the cloud. The gateway is a generic service, so the really important part is to add a "destination". The destination defines the secure connection to be established between the Bluemix cloud infrastructure and the local (private, on-premise) server.
The destination that I added was to my local DB2. Because it is behind a router and firewall with its own network address, I had to use the shown IP addres. The local DB2 instance uses the default port 50000 for TCP-based connections.
 |
| Destination to my local DB2 |
Once the destination is defined, the next is to bring the Bluemix platform and the local server together. This is accomplished by starting the secure gateway client on the local server. To simplify installation and speed up that step, the gateway client is provided as a Docker container. All I had to do was to execute the following line in a regular Linux shell:
sudo docker run -it ibmcom/secure-gateway-client yourDestinationID
It automatically downloaded all the necessary executables, set up the environment and I was up and running. The Bluemix Dashboard indicated that the gateway was connected and ready for use. The monitoring output in the shell told me the same:
 |
| Bluemix Secure Gateway showing "tunnel connected" and inbound connections |
When you define a destination, the local hostname or IP address and the port are mapped to an external address. So instead of using "192.168.0.29" and port "50000" in your application, something like "cap-sg-prd.integration.ibmcloud.com" and another port are used. In addition, the security level for that connection can also be defined. For my test today I didn't use any security certificates and mutual authentication because of focussing on linking the web app with my local DB2. However, when really integration enterprise services or databases, this is a must. My only security precaution was to use a temporary userid "db2user" that I created for this exercise and creating an HTML form to provide the password on demand.
Speaking of an HTML form, what was left now was the application part. I coded up a short Python script based on Flask. The script renders a default index page with a form. Once the form is submitted the app retrieves the values for the form fields, builds up a DB2 connection, and fetches system information from DB2 which then is rendered within a second HTML template. Here is the script:
 import os
 from flask import Flask,redirect,render_template,request,url_for
 import urllib
 import ibm_db

 app = Flask(__name__)

 # main page to dump some environment information
 @app.route('/')
 def index():
   # just return our static index page
   return render_template('index.html')

 @app.route('/dbinfo', methods=['GET','POST'])
 def dbinfo():
   if request.method == 'GET':
    # GET method was used, so redirect to index page
    return redirect(url_for('index'))
   else:
    # retrieve information submitted by form
    username=request.form['username']
    pword=request.form['pwd']
    gw=request.form['gateway']
    gport=request.form['port']
    dbname=request.form['database']
     db2conn = ibm_db.connect("DATABASE="+dbname+";HOSTNAME="+gw+";PORT="+gport+";UID="+username+";PWD="+pword+";","","")
    if db2conn:
     # we have a DB2 connection, so obtain system information via ENV_SYS_INFO:
     stmt = ibm_db.exec_immediate(db2conn,"select * from sysibmadm.env_sys_info")
     # fetch the result
     result = ibm_db.fetch_assoc(stmt)
     return render_template('dbinfo.html', db2info=result)
    else:
    return redirect(url_for('index'))

 # local testing or not?
 port = os.getenv('VCAP_APP_PORT', '5000')
 if __name__ == "__main__":
    app.run(host='0.0.0.0', port=int(port))
The template for the index page, "index.html":
 <!doctype html>
 <title>Welcome to DB2</title>
 <body>
  <h1>Welcome to DB2!</h1>
 <p>
 Want to retrieve dbinfo system information?
 <form action="/dbinfo" method="post">
 <p><input type="text" name="username" size="40" placeholder="user name">
 <p><input type="password" name="pwd" size="40" placeholder="password">
 <p><input type="text" name="gateway" size="40" placeholder="gateway address">
 <p><input type="text" name="port" size="40" placeholder="port">
 <p><input type="text" name="database" size="40" placeholder="database name">
 <p><input type="submit" value="Login">
 </form>
 </p>
 </body>
It renders like this:
 |
| Index page to provide login and connection information |
The "dbinfo.html" is used to render the information retrieved from the database.
 <!doctype html>
 <title>DB2 Information</title>
 <h1>DB2 Information</h1>
 {% if db2info %}
  OS name: {{db2info["OS_NAME"]}}
  <br/>OS version: {{db2info["OS_VERSION"]}}
  <br/>OS full version: {{db2info["OS_FULL_VERSION"]}}
  <br/>OS kernel version: {{db2info["OS_KERNEL_VERSION"]}}
  <br/>OS release: {{db2info["OS_RELEASE"]}}
  <br/>Total CPUs: {{db2info["OS_TOTAL_CPUS"]}}
  <br/>Configured CPUs: {{db2info["OS_CONFIGURED_CPUS"]}}
  <br/>Memory: {{db2info["TOTAL_MEMORY"]}} MByte
  <br/>OS architecture type: {{db2info["OS_ARCH_TYPE"]}}
 {% else %}
  <h1>Hello World!</h1>
  <br>No information has been retrieved.
 {% endif %}
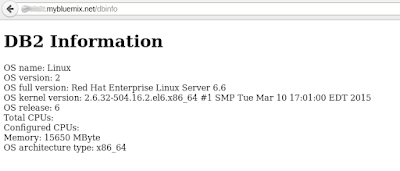
Here is the dbinfo page in action, after the information has been retrieved from DB2:
 |
| Information from on-premise DB2, retrieved by the cloud app |
This concludes my Friday experiment. Try out the Secure Gateway on Bluemix yourself. And let me know if you have questions.
BTW: If you try out something similar and you run into connection errors, a good idea is to check the local firewall on how Docker containers have access to ports on your machine, i.e., the host.