
Showing posts with label json. Show all posts
Showing posts with label json. Show all posts
Tuesday, May 9, 2023
Decode JWTs in bash
Tuesday, October 25, 2022
Things I learned at IDUG on JSON Web Token support in Db2
 |
| JSON Web Token support in Db2 |
Tuesday, September 6, 2022
New IBM Cloud security features you should know
 |
| Custom role for operating Code Engine |
Monday, March 1, 2021
JWT token authentication in Db2 runtimes like Python or Node.js
 |
| Python script connecting to Db2 with JWT |
Tuesday, January 12, 2021
Db2 Security: Configure JSON Web Token (JWT) authentication
 |
| Db2 login utilizing a JWT |
Tuesday, April 7, 2020
Encode credentials and upload to Key Protect
 |
| Protect credentials in Key Protect |
Thursday, November 30, 2017
IBM Cloud: Some fun with Python and Cloud Foundry Logging
 |
| IBM Cloud: Turn Log Data into Donut |
As usual, the code for my app is available on Github: https://github.com/data-henrik/application-log-analysis/. Once deployed to IBM Cloud, the app can be used to send messages on a chosen log level back to the server. The server-side log level, i.e., the threshold for processed log messages can also be set. The app produces diagnostic output on "stdout" and "stderr". The two are treated differently by Cloud Foundry. Here is a screenshot of the logging app:
 |
| Test app for Cloud Foundry logging |
 |
| Search Query for Elasticsearch / IBM Cloud Log Analysis |
An official tutorial using that app and Log Analysis is available in the IBM Cloud docs.
If you have feedback, suggestions, or questions about this post, please reach out to me on Twitter (@data_henrik) or LinkedIn.
Monday, November 17, 2014
A quick look at dashDB and a happy SQuirreL
 |
| dashDB slogan on its website |
 |
| Cloudant Warehousing (dashDB) |
 |
| dashDB: schema discovery |
The welcome screen shows some of the analytic options, e.g., the database is ready to be used with either Cognos, SPSS, InfoSphere DataStage, R scripts, or all of them and more:
 |
| Analytis for dashDB: Cognos, SPSS, DataStage, R |
 |
| SQuirrel SQL client - dashDB connected |
My lessons learned from testing database queries on the converted data (JSON to relational) will be part of another blog entry. Stay tuned...
Monday, October 13, 2014
Node-RED: Simple "phoney" JSON entries in Cloudant
 |
| Node-RED Starter on IBM Bluemix |
The Node-RED boilerplate automatically creates a Node.js runtime environment on Bluemix and installs the Node-RED tool into it. In addition, a Cloudant JSON database is created. Once everything is deployed I opened the Node-RED tool in a Web browser. It offers a basic set of different input and output methods, processing nodes, and the ability to connect them in a flow graph. One of the input nodes is a listener for http requests. They help to react to Web service requests. I placed such http input node on the work sheet and labeled it "phone" (see screenshot).
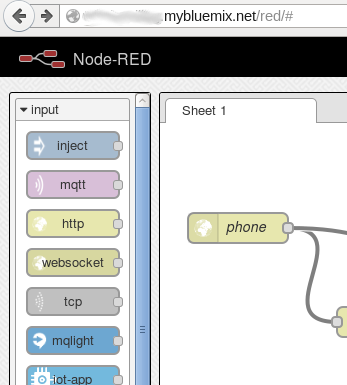 |
| Node-RED tool on Bluemix |
How did I obtain information about callers and the numbers they called?
What I needed now was the data processing flow of the Web services request. On Friday I already tweeted the entire flow:
Easy. Cool. #NodeRED used to store #caller info coming from #sipgate API into #Cloudant on #Bluemix pic.twitter.com/MFkqFAdp5D
— Henrik Loeser (@data_henrik) October 10, 2014
On the left we see "phone" node as http input. Connected to it is the "ok" node which sends an http response back, telling the phone company's Web services that we received the information. The other connected node is a "json" processor which translates the payload (who called which number) into a meaningful JSON object. That object is then moved on to the "calls" node, a Cloudant output node. All we needed was to select the Cloudant service on Bluemix and to configure the database name.
 |
| Cloudant Output Node, Node-RED on Bluemix |
 |
| "Phoney" record in Cloudant |
Friday, July 25, 2014
The Hunt for the Chocolate Thief (Part 2) - Putting IBM Bluemix, Cloudant, and a Raspberry Pi to good use
I am still on the hunt for the mean chocolate thief, kind of. In the first part I covered the side of the Raspberry Pi and uploading data to Cloudant. I showed how to set up an infrared motion sensor and a webcam with the RPi, capture a snapshot and secure the image and related metadata in a Cloudant database on the IBM Bluemix Platform-as-a-service (PaaS) offering. In this part I am going to create a small reporting website with Python, hosted as a IBM Bluemix service.
Similar to an earlier weather project, I use Python as scripting language. On Bluemix, which is based on Cloud Foundry, this means to "bring your own buildpack". I already described the necessary steps which is to tell Bluemix how to create the runtime environment and install the needed Python libraries. So how do I access the incident data, i.e., the webcam snapshots taken by the Raspberry Pi when someone is in front of the infrared motion sensor? Let's take a look at the script:
The setup phase includes reading in access data for the Cloudant database server. Either that information is taken from a Bluemix environment variable or provided in a file "cloudant.json" (similar to what I did on the RPi). The main part of the script defines three routes, i.e., how to react to certain URL requests. The index page (index()) returns an overview of all recorded incidents, an incident detail page (incident(id)) fetches the data for a single event and embeds the stored webcam image into the generated page, and the last route (image(id)) redirects the request to Cloudant.
Looking at how the index page is generated, you will notice that a predefined Cloudant view (secondary index) named "incidents/incidents" is evaluated. It is a simple reduce function that sorts based on the timestamp and document ID and returns just that composite key.
function(doc) {
if (doc.type == "oc")
emit({"ts" : doc.timestamp, "id" : doc._id}, 1);
}
Then I access the timestamp information and generate the list as shown in the screenshot above.
The incident detail page has the document ID as parameter. This makes it simple to retrieve the entire document and print the details. The webcam image is embedded. So who got my chocolate? Take a look. It looks like someone who got a free copy of "Hadoop for Dummies" at the IDUG North America conference.
Maybe another incident will shed light into this mystery. Hmm, looks like someone associated to the "Freundeskreis zur Förderung des Zeppelin Museums e.V." in Friedrichshafen. I showed the pictures to my wife and she was pretty sure who took some chocolate. I should pay more attention when grabbing another piece of my chocolate and should more closely watch how much I am eating/enjoying.
Have a nice weekend (and remember to sign up for a free Bluemix account)!
Similar to an earlier weather project, I use Python as scripting language. On Bluemix, which is based on Cloud Foundry, this means to "bring your own buildpack". I already described the necessary steps which is to tell Bluemix how to create the runtime environment and install the needed Python libraries. So how do I access the incident data, i.e., the webcam snapshots taken by the Raspberry Pi when someone is in front of the infrared motion sensor? Let's take a look at the script:
 import os
 from flask import Flask,redirect
 import urllib
 import datetime
 import json
 import couchdb


 app = Flask(__name__)

 # couchDB/Cloudant-related global variables
 couchInfo=''
 couchServer=''
 couch=''

 #get service information if on Bluemix
 if 'VCAP_SERVICES' in os.environ:
   couchInfo = json.loads(os.environ['VCAP_SERVICES'])['cloudantNoSQLDB'][0]
   couchServer = couchInfo["credentials"]["url"]
   couch = couchdb.Server(couchServer)
 #we are local
 else:
   with open("cloudant.json") as confFile:
    couchInfo=json.load(confFile)['cloudantNoSQLDB'][0]
    couchServer = couchInfo["credentials"]["url"]
    couch = couchdb.Server(couchServer)

 # access the database which was created separately
 db = couch['officecam']

 @app.route('/')
 def index():
   # build up result page
   page='<title>Incidents</title>'
   page +='<h1>Security Incidents</h1>'

   # Gather information from database about which city was requested how many times
   page += '<h3>Requests so far</h3>'
   # We use an already created view
   for row in db.view('incidents/incidents'):
     page += 'Time: <a href="/incident/'+str(row.key["id"])+'">'+str(row.key["ts"])+'</a><br/>'

   # finish the page structure and return it
   return page

 @app.route('/incident/<id>')
 def incident(id):
   # build up result page
   page='<title>Incident Detail</title>'
   page +='<h1>Security Incident Details</h1>'
   doc=db.get(id)
   # Gather information from database about the incident
   page += '<br/>Incident at date/time:'+str(doc["timestamp"])
   page += '<br/>reported by "'+doc["creater"]+'" at location "'+doc["location"]+'"'
   page += '<br/>Photo taken:<br/><img src="/image/'+id+'" />'
   # finish the page structure and return it
   return page

 @app.route('/image/<id>')
 def image(id):
   #redirecting the request to Cloudant for now, but should be hidden in the future
   return redirect(couchServer+'/officecam/'+id+'/cam.jpg')


 port = os.getenv('VCAP_APP_PORT', '5000')
 if __name__ == "__main__":
app.run(host='0.0.0.0', port=int(port))  |
| Overview of Security Incidents |
Looking at how the index page is generated, you will notice that a predefined Cloudant view (secondary index) named "incidents/incidents" is evaluated. It is a simple reduce function that sorts based on the timestamp and document ID and returns just that composite key.
 |
| Incident Detail: Hadoop involved? |
if (doc.type == "oc")
emit({"ts" : doc.timestamp, "id" : doc._id}, 1);
}
The incident detail page has the document ID as parameter. This makes it simple to retrieve the entire document and print the details. The webcam image is embedded. So who got my chocolate? Take a look. It looks like someone who got a free copy of "Hadoop for Dummies" at the IDUG North America conference.
Maybe another incident will shed light into this mystery. Hmm, looks like someone associated to the "Freundeskreis zur Förderung des Zeppelin Museums e.V." in Friedrichshafen. I showed the pictures to my wife and she was pretty sure who took some chocolate. I should pay more attention when grabbing another piece of my chocolate and should more closely watch how much I am eating/enjoying.
 |
| Zeppelin Brief seen at robbery |
Have a nice weekend (and remember to sign up for a free Bluemix account)!
Wednesday, July 2, 2014
Nice Cloud, no rain: Using Cloudant/couchDB with Python on Bluemix
My last two blog entries were about getting started with Python on IBM Bluemix and how to use a custom domain with my Bluemix weather application. Today I am going to show how I added Cloudant and couchDB to my application, both locally and on Bluemix.
Storing the weather data locally doesn't make sense because I can query much more historical data on OpenWeatherMap. So I am going to use a database to log information about for which city and when the data was requested. That information, in aggregated form, could then be reported as fun fact to each user of the app. I chose Cloudant because it is simple to use, adequate for the intended purpose, has free usage plans on Bluemix, and I can use it and test locally as couchDB.
The code itself is relatively simple and I put comments (shown at the end of the article). The interesting part is how to add a Cloudant service to my application on Bluemix, how to bind them in the application, and the preparation work for the database itself. So let's take a look at those steps.
Cloudant is offered as one of several services in the "Data Management" category on Bluemix. While on the Dashboard you simply click on the "Add a service" button as show on the right. Navigate to the Data Management section and choose Cloudant.
It will bring up a screen showing information about the service itself, on usage terms, and on the right side of it a dialog "Add Service" for adding the service to your account. Here you can already bind the new database service to your application by selecting an existing application from a dropdown list. I did that and gave my new Cloudant service the name "cloudantWeather" as shown:
Once the service is added you can bring up the Cloudant administration interface. I have used Cloudant and couchDB before, so that isn't anything new. To avoid dealing with creation of a database as part of the actual program I decided to create a "weather" database through the administration interface for the hosted Cloudant and my local couchDB servers. An interesting but not too tricky part is how to access both servers depending on where the application is running. Information with the username, password, server address and other details is provided in an environment variable VCAP_SERVICES when run on Bluemix. Thus, in the program I am testing for the presence of that variable and then either retrieve the server information from it or access my local couchDB:
Storing new documents is simple and is shown in the full code listing. For the queries I am using the MapReduce feature of couchDB. In a "map" function I return the city name (and just the integer value 1), in the reduce function I am aggregating (summing up) the values by city. Both functions could be defined in the Python script and then passed into Cloudant as part of the query or predefined for more performance. I chose the latter one. So I created a so-called "secondary index" in my Cloudant database, it is called "view" in my couchDB. They are stored as part of a "design document" (shown is Cloudant):
With that I finish my Python application, add some calls to the couchDB Python API (which I needed to add to the file "requirements.txt" as dependency) and test it locally. The final step is to deploy the application to Bluemix using the Cloud Foundry tool "cf push". Done, seems to work:
Last but not least, here is the code I used for my little app:
Storing the weather data locally doesn't make sense because I can query much more historical data on OpenWeatherMap. So I am going to use a database to log information about for which city and when the data was requested. That information, in aggregated form, could then be reported as fun fact to each user of the app. I chose Cloudant because it is simple to use, adequate for the intended purpose, has free usage plans on Bluemix, and I can use it and test locally as couchDB.
 |
| Add Cloudant as new service |
Cloudant is offered as one of several services in the "Data Management" category on Bluemix. While on the Dashboard you simply click on the "Add a service" button as show on the right. Navigate to the Data Management section and choose Cloudant.
It will bring up a screen showing information about the service itself, on usage terms, and on the right side of it a dialog "Add Service" for adding the service to your account. Here you can already bind the new database service to your application by selecting an existing application from a dropdown list. I did that and gave my new Cloudant service the name "cloudantWeather" as shown:
 |
| Bind Cloudant to your application |
#get service information if on Bluemix
 if 'VCAP_SERVICES' in os.environ:
   couchInfo = json.loads(os.environ['VCAP_SERVICES'])['cloudantNoSQLDB'][0]
   couchServer = couchInfo["credentials"]["url"]
   couch = couchdb.Server(couchServer)
 #we are local
 else:
   couchServer = "http://127.0.0.1:5984"
   couch = couchdb.Server(couchServer)
Storing new documents is simple and is shown in the full code listing. For the queries I am using the MapReduce feature of couchDB. In a "map" function I return the city name (and just the integer value 1), in the reduce function I am aggregating (summing up) the values by city. Both functions could be defined in the Python script and then passed into Cloudant as part of the query or predefined for more performance. I chose the latter one. So I created a so-called "secondary index" in my Cloudant database, it is called "view" in my couchDB. They are stored as part of a "design document" (shown is Cloudant):
 |
| Secondary index / permanent view |
With that I finish my Python application, add some calls to the couchDB Python API (which I needed to add to the file "requirements.txt" as dependency) and test it locally. The final step is to deploy the application to Bluemix using the Cloud Foundry tool "cf push". Done, seems to work:
 |
| Bluemix weather app with Cloudant stats |
Last but not least, here is the code I used for my little app:
 import os
 from flask import Flask,redirect
 import urllib
 import datetime
 import json
 import couchdb

 BASE_URL = "http://api.openweathermap.org/data/2.5/weather?q="
 BASE_URL_fc ="http://api.openweathermap.org/data/2.5/forecast/daily?cnt=1&q="
 app = Flask(__name__)

 # couchDB/Cloudant-related global variables
 couchInfo=''
 couchServer=''
 couch=''

 #get service information if on Bluemix
 if 'VCAP_SERVICES' in os.environ:
   couchInfo = json.loads(os.environ['VCAP_SERVICES'])['cloudantNoSQLDB'][0]
   couchServer = couchInfo["credentials"]["url"]
   couch = couchdb.Server(couchServer)
 #we are local
 else:
   couchServer = "http://127.0.0.1:5984"
   couch = couchdb.Server(couchServer)

 # access the database which was created separately
 db = couch['weather']

 @app.route('/')
 def index():
   return redirect('/weather/Friedrichshafen')

 @app.route('/weather/<city>')
 def weather(city):
   # log city into couchDB/Cloudant
   # basic doc structure
   doc= { "type" : "city",
     "c_by" : "bm",
   }
   # we store the city and the current timestamp
   doc["city"]=city
   doc["timestamp"]=str(datetime.datetime.utcnow())
   # and store the document
   db.save (doc)

   # Time to grab the weather data and to create the resulting Web page
   # build URIs and query current weather data and forecast
   # JSON data needs to be converted
   url = "%s/%s" % (BASE_URL, city)
   wdata = json.load(urllib.urlopen(url))
   url_fc = "%s/%s" % (BASE_URL_fc, city)
   wdata_fc = json.load(urllib.urlopen(url_fc))

   # build up result page
   page='<title>current weather for '+wdata["name"]+'</title>'
   page +='<h1>Current weather for '+wdata["name"]+' ('+wdata["sys"]["country"]+')</h1>'
   page += '<br/>Min Temp. '+str(wdata["main"]["temp_min"]-273.15)
   page += '<br/>Max Temp. '+str(wdata["main"]["temp_max"]-273.15)
   page += '<br/>Current Temp. '+str(wdata["main"]["temp"]-273.15)+'<br/>'
   page += '<br/>Weather: '+wdata["weather"][0]["description"]+'<br/>'
   page += '<br/><br/>'
   page += '<h2>Forecast</h2>'
   page += 'Temperatures'
   page += '<br/>Min: '+str(wdata_fc["list"][0]["temp"]["min"]-273.15)
   page += '<br/>Max: '+str(wdata_fc["list"][0]["temp"]["max"]-273.15)
   page += '<br/>Morning: '+str(wdata_fc["list"][0]["temp"]["morn"]-273.15)
   page += '<br/>Evening: '+str(wdata_fc["list"][0]["temp"]["eve"]-273.15)
   page += '<br/><br/>Weather: '+wdata_fc["list"][0]["weather"][0]["description"]
   page += '<br/><br/>'

   # Gather information from database about which city was requested how many times
   page += '<h3>Requests so far</h3>'
   # We use an already created view
   for row in db.view('weatherQueries/cityCount',group=True):
    page += row.key+': '+str(row.value)+'<br/>'

   # finish the page structure and return it
   page += '<br/><br/>Data by <a href="http://openweathermap.org/">OpenWeatherMap</a>'
   return page

 port = os.getenv('VCAP_APP_PORT', '5000')
 if __name__ == "__main__":
app.run(host='0.0.0.0', port=int(port)) Friday, March 28, 2014
XML or JSON: When to choose what for your database
There is a new article on IBM developerWorks titled "XML or JSON: Guidelines for what to choose for DB2 for z/OS". It has been written by two very experienced technologists with DB2 background. Though the comparison and the many code examples for how to use either XML or JSON are for DB2 for z/OS, most of it also applies to DB2 LUW. So I recommend reading the article regardless of which "camp" you are in.
At the end of the XML vs. JSON comparison is a resource section with a list of good papers and documentation. In my blog's page on DB2 & pureXML Resources you will also find additional material on that topic.
With that to read enjoy the weekend!
At the end of the XML vs. JSON comparison is a resource section with a list of good papers and documentation. In my blog's page on DB2 & pureXML Resources you will also find additional material on that topic.
With that to read enjoy the weekend!
Thursday, June 27, 2013
(Updated) NoSQL and JSON with DB2
You may have heard that DB2 10.5, which recently became available, includes a technology preview "DB2 NoSQL JSON". JSON is the JavaScript Object Notation. The important stuff for JSON in DB2 can be found in the sqllib/json directory. Once I added the "lib" directory to the Java CLASSPATH, I could invoke a new command line processor "db2nosql" (found in "bin"):
hloeser@rotach:~/sqllib/json/bin$ sh db2nosql.sh
JSON Command Shell Setup and Launcher.
This batch script assumes your JRE is 1.5 and higher. 1.6 will mask your password.
Type db2nosql.sh -help to see options
Enter DB:jsontest
IBM DB2 NoSQL API 1.1.0.0 build 1.0.169
Licensed Materials - Property of IBM
(c) Copyright IBM Corp. 2013 All Rights Reserved.
Debug mode is off.
nosql>
nosql>Type your JSON query and end it with ;
nosql>Type help() or help for usage information
nosql>
nosql>Setup Tables and Functions seems to have not been created or have been created incorrectly. Please type enable(true) and enter to setup them up. You must have the correct admin privileges.
If you do not, type enable(false) and enter to see the SQL that will be used.
After entering the database name to use I got connected. Next was to enable the database for JSON processing as suggested above.
nosql>enable(true)
Executing SQL...
Database Artifacts created successfully
If you use "enable(false)" the tool will just print the DDL to execute manually. This is the creation of a system table SYSTOOLS.SYSJSON_INDEX and several functions. Next I set a JSON namespace. By default the user schema would be taken as namespace. Because I plan to look into storage details later on, I chose "TEST" (which will use the SQL schemaname "TEST" under covers).
nosql>use test
Switched to schema TEST
Then I was good to go and insert two documents. Note that it is not necessary to create any table, collection, index or anything. Trying to find one of the documents I stored via predicate also worked.
nosql>db.obj.insert({name: "Henrik", country: "DE"})
OK
nosql>db.obj.insert({name: "Jim", country: "US"})
OK
nosql>db.obj.find({country: "US"})
nosql>Row 1:
nosql> {
nosql> "_id":{"$oid":"51c9acf301c690e828779af2"},
nosql> "name":"Jim",
nosql> "country":"US"
nosql> }
nosql>1 row returned in 134 milliseconds.
Some more commands are described in a recent developerWorks article on JSON in DB2. I also plan to write more about my adventures here in this blog.
Added 27.06.2013:
A couple more developerWorks articles are now available:
- Series on InfoSphere Guardium data security and protection for MongoDB
- Series on DB2 JSON NoSQL Capabilities
Subscribe to:
Posts (Atom)